Compiling Zandronum with Visual Studio: Difference between revisions
DrinkyBird (talk | contribs) (Mention VS2017 XP component) Tag: Source edit |
DrinkyBird (talk | contribs) (Rename thg section to just Mercurial; point to mercurial-scm.org as it tends to be more up to date than the thg site) Tag: Source edit |
||
| (2 intermediate revisions by the same user not shown) | |||
| Line 9: | Line 9: | ||
[[File:Vs2022 cppdevel.png|none]]</li> | [[File:Vs2022 cppdevel.png|none]]</li> | ||
<li>On the | <li>On the '''Individual components''' tab, scroll down to the '''Compilers, build tools, and runtimes''' section, and select the '''MSVC v140 - VS 2015 C++ build tools (v14.00)''' and '''C++ Windows XP Support for VS 2017 (v141) tools''' components.</li> | ||
<li>Proceed with the installation.</li> | <li>Proceed with the installation.</li> | ||
| Line 33: | Line 32: | ||
<!-- IGNORE THIS FOR NOW :x64 platforms use this: https://zdoom.org/files/fmod/fmodapi42416win64-installer.exe --> | <!-- IGNORE THIS FOR NOW :x64 platforms use this: https://zdoom.org/files/fmod/fmodapi42416win64-installer.exe --> | ||
== | == Mercurial == | ||
https:// | Download the latest version of TortoiseHg for Windows from [https://www.mercurial-scm.org/ the Mercurial website]. This bundle includes Mercurial itself and the TortoiseHg graphical user interface. | ||
Used for downloading the source code and fetching the Mercurial revision ID when compiling the build. | Used for downloading the source code and fetching the Mercurial revision ID when compiling the build. | ||
Latest revision as of 20:02, 25 March 2024
Prerequisites
Visual Studio
Zandronum requires the Visual Studio 2015 toolchain to be built. Microsoft no longer offers 2015 for (easy) download, but forunately, modern versions of Visual Studio can use older toolchains.
- Download Visual Studio 2022 Community.
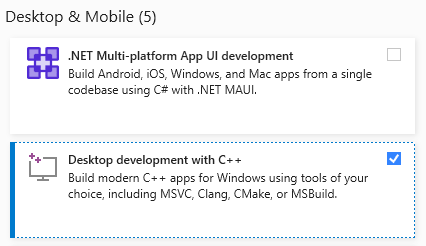
- In the installer, select the Desktop development with C++ workload.

- On the Individual components tab, scroll down to the Compilers, build tools, and runtimes section, and select the MSVC v140 - VS 2015 C++ build tools (v14.00) and C++ Windows XP Support for VS 2017 (v141) tools components.
- Proceed with the installation.
CMake
Download the latest version of CMake from cmake.org. We will use this to generate the projects.
NASM
For Visual Studio 2015 or newer, the latest nasm version is required. Currently, this is Version 2.11.08.
FMOD Ex
The old FMOD Ex links were removed from the FMOD website, so ZDoom has archived them at https://zdoom.org/files/fmod/.
For Zandronum 3.1, version 4.44.64 is recommended (the final release of FMOD Ex.)
- Quick Windows link: https://zdoom.org/files/fmod/fmodapi44464win-installer.exe
For Zandronum 3.0, version 4.24.x is required, version 4.24.16 recommended
- Quick Windows link: https://zdoom.org/files/fmod/fmodapi42416win32-installer.exe
Mercurial
Download the latest version of TortoiseHg for Windows from the Mercurial website. This bundle includes Mercurial itself and the TortoiseHg graphical user interface.
Used for downloading the source code and fetching the Mercurial revision ID when compiling the build.
If you wish to build a specific topic, you must enable the topic and evolve Mercurial extensions. To do so, either:
- Open TortoiseHg Workbench, go to the File menu -> Settings, open the global settings tab, open the Extensions section, and select the topic and evolve extensions, then completely exit TortoiseHg Workbench.
- or, manually add the following to mercurial.ini in your user directory:
[extensions]
topic =
evolve =
DirectX SDK
https://wiki.zandronum.com/files/DXSDK_Feb10.exe
Zandronum depends on DirectDraw for software rendering on Windows, so the February 2010 SDK release is required.
OpenGL Header Files
- OpenGL 1.2 and above compatibility profile and extension interfaces: glext.h
- WGL Extension interfaces: wglext.h
Note that you may need to put the glext.h and wglext.h into your C:\Program Files\Microsoft SDKs\Windows\v6.1\includes\gl folder (create it if it doesn't exist). To resolve compiling issues under 'gl_clock.cpp' with _interlockedbittestandset and _interlockedbittestandreset, refer here
OpenSSL
OpenSSL is necessary in order for Zandronum to communicate securely with the account authentication server.
Precompiled binaries for Windows are available from Shining Light Productions. You will want the latest non-light edition of OpenSSL (both 3.x.x and 1.x.x are known to work) - the description of the correct package mentions "software developers". You should have a choice between 32-bit and 64-bit versions - you will most likely need the 32-bit version unless you are using CMake and select the 64-bit compiler when generating your build files.
Building OpenSSL
If the above packages do not work, you can compile OpenSSL yourself. This is a lengthy and complicated process, so be sure that the existing binaries of OpenSSL definitely don't work before you try this.
- Perl is necessary to build OpenSSL. If you don't have Perl installed already, install ActiveState Perl.
- NASM executable directory must be in the host system's
PATHenvironment variable.
- Download and decompress the latest source of OpenSSL. In the source directory call
perl Configure VC-WIN32 --prefix=c:\Tools\Util\openssl
ms\do_nasm
- Replace
c:\Tools\Util\opensslwith the path where you want OpenSSL to be installed. Then, in the same directory, but within a VC++ command prompt, call
nmake -f ms\nt.mak
nmake -f ms\nt.mak test
nmake -f ms\nt.mak install
- If an error message 'WinSock32.h does not exist!' is displayed (or the like), you'll need to add these two lines to your console's temporary environment:
SET INCLUDE=%INCLUDE%;c:\Program Files\Microsoft SDKs\Windows\v7.0\Include\
SET LIB=%LIB%;c:\Program Files\Microsoft SDKs\Windows\v7.0\Lib\
Python
https://www.python.org/downloads/
Version 3.5 or newer is required.
Opus
The Opus audio codec is required for voice chat support.
Download the latest libopus archive from the Opus website. Extract the archive, then open the win32\VS2015\opus.sln solution (allow Visual Studio to upgrade the projects if necessary). Build the Release configuration for the same platform you will build Zandronum for (Win32 or x64).
After building, you will have a static library built under your libopus directory at win32\VS2015\Win32\Release\opus.lib or win32\VS2015\x64\Release\opus.lib. Pass the full path to the relevant library as the OPUS_LIBRARIES variable when it comes time to run CMake. Additionally, pass the libopus include folder as OPUS_INCLUDE_DIR.
Zandronum Source Code
And of course, you will require the Zandronum source code to build Zandronum! You must clone the source with Mercurial to create a build that is compatible with servers.
In the directory where you want to download the source, right-click on empty space, and go to TortoiseHg → Clone.
Enter https://foss.heptapod.net/zandronum/zandronum-stable as the source.
If you want to clone a specific revision, expand Options, check Clone to revision, and enter the revision you want to clone.
For example, if you wanted to download Zandronum 3.1's source, you'd enter ZA_3.1.
Optional prerequisites
Logitech G-Series LCD SDK
Only available with the keyboard drivers from Logitech hardware.
Build using Visual Studio
Generate Projects

Open CMake (cmake-gui) and set the Where is the source code textbox to where you downloaded the Zandronum source code. Set Where to build the binaries to wherever you want the project files to be generated.
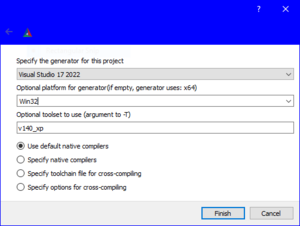
Click Configure and a dialog will pop up.
- Set the generator to Visual Studio 17 2022.
- Set the platform to Win32 for a 32-bit build or x64 for a 64-bit build.
- Set the toolset to v140_xp.
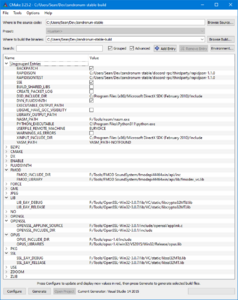
If it says there was an error, ignore it as we will solve it now. Make sure you set up all prerequisites correctly, and point CMake to the location of any missing paths. Select the Advanced and Grouped checkboxes to reveal and group all options.
Then click Configure again, and point CMake to missing paths.
LIB_EAY and SSL_EAY are OpenSSL libraries.
YASM is unneeded as we already have NASM.

Click Configure again and your CMake should look like the image on the left. Now click Generate. This will generate the project files.
Build Zandronum
Now go to where you generated the project files and open Zandronum.sln.
At the top, there will be a Build menu. Click it and click Build Solution.
Now wait for Zandronum to build. It is a large project and will take time to build.
If you encounter an error, see Troubleshooting below.
Once successfully compiled, zandronum.exe will be in the Debug folder in the project directory.
zandronum.pk3 will be in the project directory.
Troubleshooting
'Cr0NpxState' : is not a member of _FLOATING_SAVE_AREA
Just comment out the line that calls this, according to zdoom devs, it is only there to give info and doesn't actually affect the project.
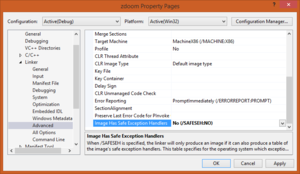
error LNK1281: Unable to generate SAFESEH image
When using Visual Studio 2015 or newer, update to the latest nasm version.

Set `/SAFESEH:NO` by going into the properties of the `zdoom` project and navigating to Configuration Properties → Linker → Advanced and changing Image Has Safe Exception Handlers to No (/SAFESEH:NO).

