Compiling Zandronum on Mac: Difference between revisions
m (Images fixed) |
DrinkyBird (talk | contribs) (Update OSDN link to Heptapod) Tag: Source edit |
||
| (11 intermediate revisions by 2 users not shown) | |||
| Line 1: | Line 1: | ||
==Install dependencies== | ==Install dependencies== | ||
[ | [https://zandronum.com/ Zandronum] needs certain tools and development files in order to compile: | ||
*'''Required''' | *'''Required''' | ||
**[https://developer.apple.com/xcode/ Xcode] | **[https://developer.apple.com/xcode/ Xcode] | ||
| Line 7: | Line 7: | ||
**[https://github.com/libsdl-org/SDL/releases/latest SDL2] with [https://github.com/libsdl-org/sdl12-compat/releases SDL 1.2 Compatibility] | **[https://github.com/libsdl-org/SDL/releases/latest SDL2] with [https://github.com/libsdl-org/sdl12-compat/releases SDL 1.2 Compatibility] | ||
**[https://github.com/nigels-com/glew/releases GLEW] | **[https://github.com/nigels-com/glew/releases GLEW] | ||
**[ | **[https://zandronum.com/essentials/fmod/ FMOD Ex] 4.44.64 | ||
**[https://www.python.org/downloads/ Python3] (It's | **[https://www.python.org/downloads/ Python3] (It's already on the Mac) | ||
**[https://www.openssl.org/source/ Openssl] ''(for Zandronum 1.3 or later)'' | **[https://www.openssl.org/source/ Openssl] ''(for Zandronum 1.3 or later)'' | ||
**SQLite ''(for Zandronum 1.3 or later)'' | **SQLite ''(for Zandronum 1.3 or later)'' | ||
**[https://www.mercurial-scm.org/downloads TortoiseHg] ''(needed in order to [https:// | **[https://www.mercurial-scm.org/downloads TortoiseHg] ''(needed in order to [https://foss.heptapod.net/zandronum/zandronum-stable download the source] and compile in commit meta data)'' | ||
*'''Optional''' | *'''Optional''' | ||
**Fluidsynth (''For Midi Device'') | **Fluidsynth (''For Midi Device'') | ||
| Line 24: | Line 24: | ||
=== Command line Tools === | === Command line Tools === | ||
Open Terminal.app and paste this | Open Terminal.app and paste this command: | ||
xcode-select --install | xcode-select --install | ||
This'll pop up: | |||
[[File:Xcode Command Line Tools popup.png|border|frameless]] | [[File:Xcode Command Line Tools popup.png|border|frameless]] | ||
Install it ( | Install it. (Caution: it's big so make sure you got enough space) | ||
=== App Store (if you have an newer system) === | === App Store (if you have an newer system) === | ||
[https://apps.apple.com/au/app/xcode/id497799835?mt=12 Xcode] (Click the link | [https://apps.apple.com/au/app/xcode/id497799835?mt=12 Xcode] (Click the link, it'll go straight to the App Store) | ||
=== Apple developer (if you have an older system) === | === Apple developer (if you have an older system) === | ||
https://developer.apple.com/download/all/ (Sign | https://developer.apple.com/download/all/ (Sign in is required. It includes Command line Tools as well) | ||
== Rosetta (Optional) == | |||
If you are using M1 or M2 (ARM64), then this is required: | |||
softwareupdate --install-rosetta | |||
== Installing from HomeBrew or Macports == | == Installing from HomeBrew or Macports == | ||
| Line 44: | Line 48: | ||
=== MacPorts (Legacy MacOS) === | === MacPorts (Legacy MacOS) === | ||
sudo port install | sudo port install libjpeg-turbo fluidsynth openssl sdl2 sdl12-compat | ||
== Installing CMake GUI and TortoiseHG == | == Installing CMake GUI and TortoiseHG == | ||
Download [https://cmake.org/download/ CMake] and [https://www.mercurial-scm.org/downloads TortoiseHG] | Download [https://cmake.org/download/ CMake] and [https://www.mercurial-scm.org/downloads TortoiseHG] | ||
| Line 51: | Line 55: | ||
== Create zandronum_build directory == | == Create zandronum_build directory == | ||
Open Terminal.app and paste this command: | |||
mkdir -pv ~/zandronum_build | mkdir -pv ~/zandronum_build | ||
| Line 57: | Line 61: | ||
==== If you already have this installed using HomeBrew or Macports. Please skip this section. ==== | ==== If you already have this installed using HomeBrew or Macports. Please skip this section. ==== | ||
Create a | Create a directory like this: | ||
cd ~/zandronum_build && mkdir -pv sdl_pack | cd ~/zandronum_build && mkdir -pv sdl_pack | ||
Download [https://github.com/libsdl-org/SDL/releases/latest SDL2] and [https://github.com/libsdl-org/sdl12-compat/releases SDL 1.2 Compatibility] | Download [https://github.com/libsdl-org/SDL/releases/latest SDL2] and [https://github.com/libsdl-org/sdl12-compat/releases SDL 1.2 Compatibility] and extract them into it. | ||
Or | Or | ||
Clone it: | Clone it: | ||
git clone https://github.com/libsdl-org/sdl12-compat.git && git clone | git clone https://github.com/libsdl-org/sdl12-compat.git && git clone https://github.com/libsdl-org/SDL.git | ||
Click on the CMake app that you added into | Click on the CMake app that you added into Applications, it'll give you a warning that you downloaded a third party app on Mac, just hit OK. | ||
Click Browse Source, choose where you put SDL12-Compat, then click Open. | |||
It's better if you build it inside the source, so do the same in Browse Build. Add a new folder into SDL12-Compat called Build. | |||
When you click Configure it'll popup a window, choose "Unix Makefiles" (It's faster than using Xcode type) and click Done. | |||
Configure CMake like the image below: | |||
[[File:SDL_macOS_2.png|border|frameless]] | |||
Make sure you disable SDL12TESTS as we don't need it and make the default architecture x86_64 because we are not using ARM64 until further releases. | |||
Then check Advanced to display the SDL2 Section. | |||
Configure only SDL_INCLUDE_DIR. | |||
[[File:Sdl_advanced.png|border|frameless]] | [[File:Sdl_advanced.png|border|frameless]] | ||
Generate, | Click Generate and then compile, it'll give you 2 files. | ||
cd ~/zandronum_build/sdl_pack/sdl12-compat/build/ && make | cd ~/zandronum_build/sdl_pack/sdl12-compat/build/ && make | ||
| Line 92: | Line 98: | ||
Add this line it to the source line: | Add this line it to the source line: | ||
https:// | https://foss.heptapod.net/zandronum/zandronum-stable | ||
Browse where you put zandronum_build in: | Browse where you put zandronum_build in: | ||
It should be like this: | |||
[[File:TortoiseHGclone.png|border|frameless]] | |||
Click Clone. | |||
==== Stable ==== | ==== Stable ==== | ||
if you are looking for Stable version go to Repository -> Update | if you are looking for the Stable version go to Repository -> Update | ||
It should pop up like this: | |||
[[File:Zan_3.1.png|frameless]] | [[File:Zan_3.1.png|frameless]] | ||
Select ZA_3.1 from the dropdown then click Update. | |||
You might need to add this patch for bundling an app: (If it does give you the text file, download it by Right clicking and selecting Save as.) | |||
https://osdn.net/downloads/users/39/39032/Appbundle.patch/ | https://osdn.net/downloads/users/39/39032/Appbundle.patch/ | ||
To add the patch: | |||
Go to Repository -> Import Patches | |||
Browse to the Appbundle.patch then click Open and then Import. (It won't include the icon for Mac OS for some reason.) | |||
https://osdn.net/downloads/users/39/39033/zandronum.icns/ | |||
Put this icon where you put the source into: | |||
/src/sdl/ | |||
== Compiling Zandronum == | |||
Open the CMake app again. | |||
This is a lot because you must compile most of the dependencies before you can do this next part, so read the readme on each source codes. Homebrew and MacPorts are fine. | |||
So firstly Browse Source and Build like you did with SDL12-Compat.<blockquote>Click Browse Source, choose where you put SDL12-Compat, then click Open. | |||
It's better if you build it inside the source, so do the same in Browse Build. Add a new folder into SDL12-Compat called Build. | |||
When you click Configure it'll popup a window, choose "Unix Makefiles" (It's faster than using Xcode type) and click Done. </blockquote>If it shows an error that means they couldn't find the rest. So you need to go through each dependency to find the directories and files then hit Generate. | |||
This is how it should look: | |||
[[File:Mac OS compiling .png|border|frameless]] | |||
If you only see SDL_INCLUDE_DIR, click Add Entry and type in SDL_LIBRARY then browse for the Dylib. | |||
Once you've done everything, compile. | |||
cd ~/zandronum_build/zandronum-stable/build/ && make -j(nproc) | |||
Once the compile is finished, all that's left to do is to add the SDL2 framework into the Frameworks directory inside the app bundle by Right clicking and selecting Show package content. | |||
There you have it, just drag the bundle into the applications, and it should be good to go. | |||
[[File:Zandronum Compiled on mac.png|border|frameless|972x972px]] | |||
Latest revision as of 22:35, 17 December 2023
Install dependencies
Zandronum needs certain tools and development files in order to compile:
- Required
- Xcode
- CMake
- Mac OS SDK
- SDL2 with SDL 1.2 Compatibility
- GLEW
- FMOD Ex 4.44.64
- Python3 (It's already on the Mac)
- Openssl (for Zandronum 1.3 or later)
- SQLite (for Zandronum 1.3 or later)
- TortoiseHg (needed in order to download the source and compile in commit meta data)
- Optional
- Fluidsynth (For Midi Device)
- zlib (Zandronum has a copy of it and will be statically compiled in if not found)
- libbzip2 (possibly static)
- libjpeg (possibly static)
- HomeBrew or Macports (Not recommended for building using M1 or M2 (ARM64) CPU)
- Rosetta 2 (for building X86_64 binaries using M1 or M2 (ARM64) CPU)
Installing Xcode
There are 3 ways to install Xcode:
Command line Tools
Open Terminal.app and paste this command:
xcode-select --install
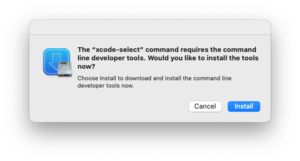
This'll pop up:
Install it. (Caution: it's big so make sure you got enough space)
App Store (if you have an newer system)
Xcode (Click the link, it'll go straight to the App Store)
Apple developer (if you have an older system)
https://developer.apple.com/download/all/ (Sign in is required. It includes Command line Tools as well)
Rosetta (Optional)
If you are using M1 or M2 (ARM64), then this is required:
softwareupdate --install-rosetta
Installing from HomeBrew or Macports
HomeBrew (MacOS 10.15 - Latest)
brew install jpeg-turbo fluid-synth openssl sdl2 sdl12-compat
MacPorts (Legacy MacOS)
sudo port install libjpeg-turbo fluidsynth openssl sdl2 sdl12-compat
Installing CMake GUI and TortoiseHG
Download CMake and TortoiseHG
Open up the DMG and copy them into Applications (or drag them).
Create zandronum_build directory
Open Terminal.app and paste this command:
mkdir -pv ~/zandronum_build
Compiling SDL12-Compat
If you already have this installed using HomeBrew or Macports. Please skip this section.
Create a directory like this:
cd ~/zandronum_build && mkdir -pv sdl_pack
Download SDL2 and SDL 1.2 Compatibility and extract them into it.
Or
Clone it:
git clone https://github.com/libsdl-org/sdl12-compat.git && git clone https://github.com/libsdl-org/SDL.git
Click on the CMake app that you added into Applications, it'll give you a warning that you downloaded a third party app on Mac, just hit OK.
Click Browse Source, choose where you put SDL12-Compat, then click Open.
It's better if you build it inside the source, so do the same in Browse Build. Add a new folder into SDL12-Compat called Build.
When you click Configure it'll popup a window, choose "Unix Makefiles" (It's faster than using Xcode type) and click Done.
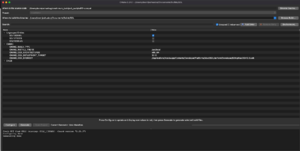
Configure CMake like the image below:
Make sure you disable SDL12TESTS as we don't need it and make the default architecture x86_64 because we are not using ARM64 until further releases.
Then check Advanced to display the SDL2 Section.
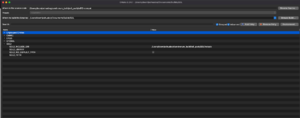
Configure only SDL_INCLUDE_DIR.
Click Generate and then compile, it'll give you 2 files.
cd ~/zandronum_build/sdl_pack/sdl12-compat/build/ && make
TortoiseHG
Open TortoiseHG.app
Go to File -> Clone Repository
Add this line it to the source line:
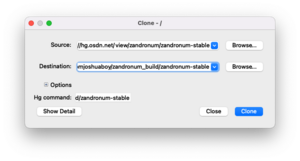
https://foss.heptapod.net/zandronum/zandronum-stable
Browse where you put zandronum_build in:
It should be like this:
Click Clone.
Stable
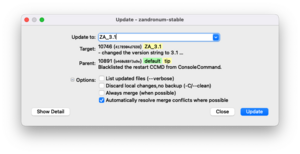
if you are looking for the Stable version go to Repository -> Update
It should pop up like this:
Select ZA_3.1 from the dropdown then click Update.
You might need to add this patch for bundling an app: (If it does give you the text file, download it by Right clicking and selecting Save as.)
https://osdn.net/downloads/users/39/39032/Appbundle.patch/
To add the patch:
Go to Repository -> Import Patches
Browse to the Appbundle.patch then click Open and then Import. (It won't include the icon for Mac OS for some reason.)
https://osdn.net/downloads/users/39/39033/zandronum.icns/
Put this icon where you put the source into:
/src/sdl/
Compiling Zandronum
Open the CMake app again.
This is a lot because you must compile most of the dependencies before you can do this next part, so read the readme on each source codes. Homebrew and MacPorts are fine.
So firstly Browse Source and Build like you did with SDL12-Compat.
Click Browse Source, choose where you put SDL12-Compat, then click Open.
It's better if you build it inside the source, so do the same in Browse Build. Add a new folder into SDL12-Compat called Build.
When you click Configure it'll popup a window, choose "Unix Makefiles" (It's faster than using Xcode type) and click Done.
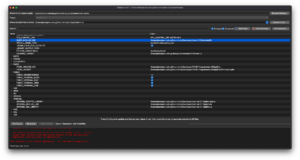
If it shows an error that means they couldn't find the rest. So you need to go through each dependency to find the directories and files then hit Generate.
This is how it should look:
If you only see SDL_INCLUDE_DIR, click Add Entry and type in SDL_LIBRARY then browse for the Dylib.
Once you've done everything, compile.
cd ~/zandronum_build/zandronum-stable/build/ && make -j(nproc)
Once the compile is finished, all that's left to do is to add the SDL2 framework into the Frameworks directory inside the app bundle by Right clicking and selecting Show package content.
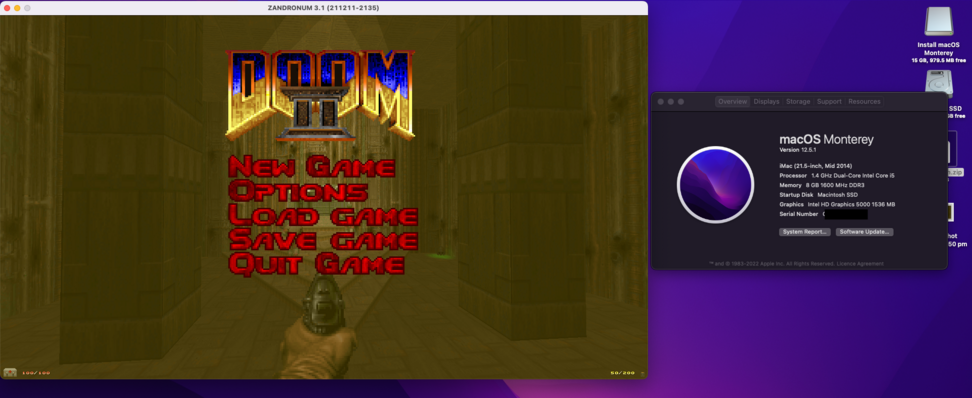
There you have it, just drag the bundle into the applications, and it should be good to go.

